Student > Results
Steps to use this screen
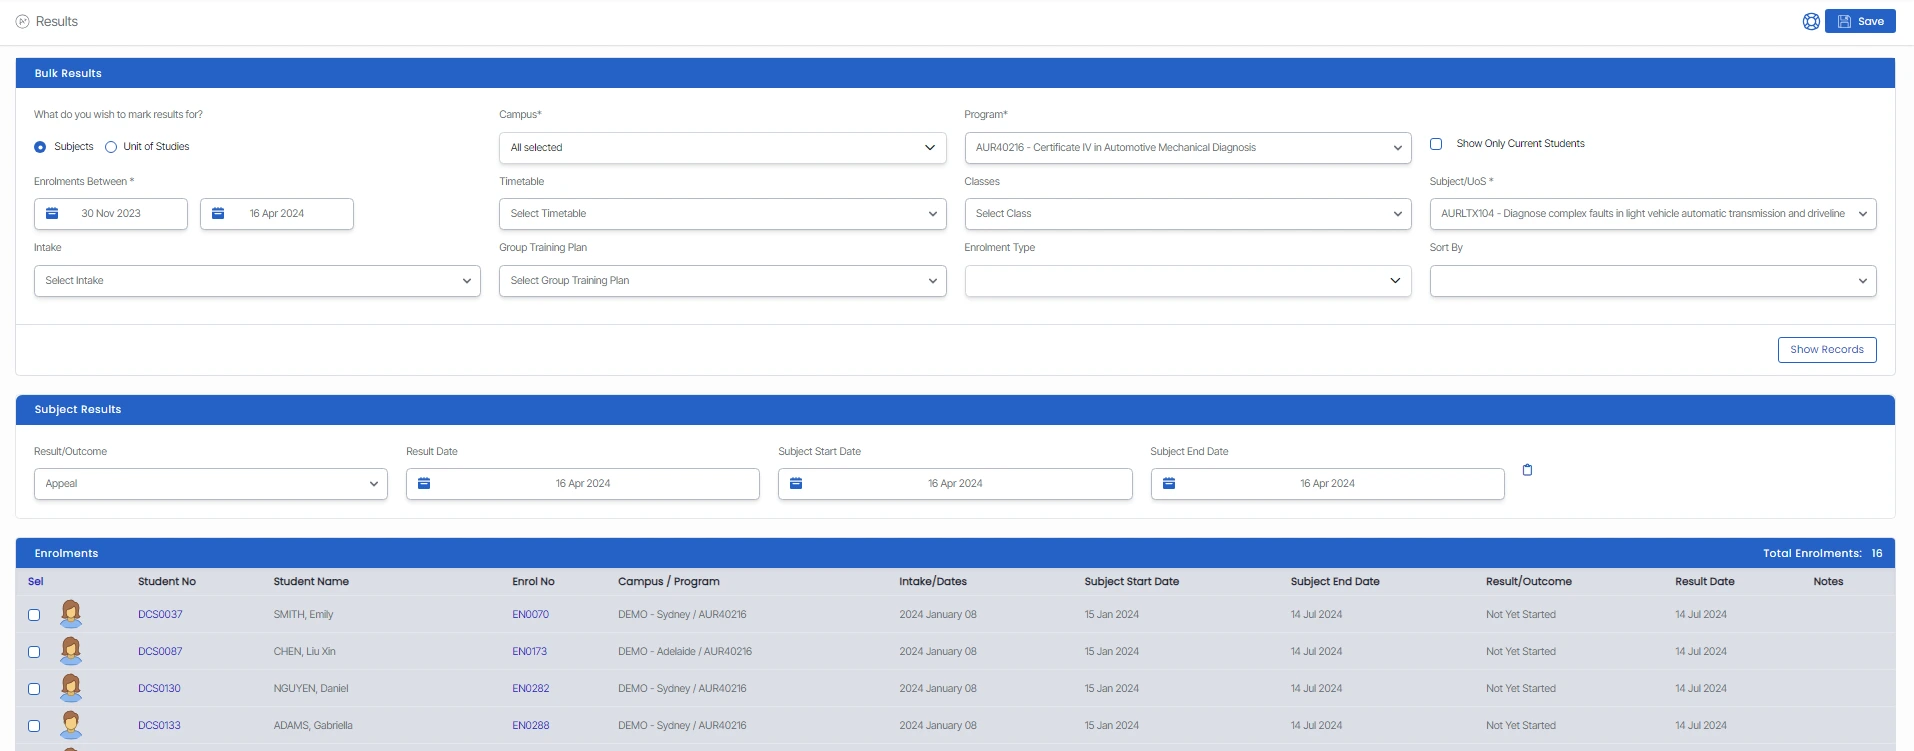
- To choose whether you want to mark results for subjects or units of studies, select the appropriate radio buttons. These buttons are usually located on the Results screen and allow you to choose between marking results for individual subjects or entire units of study. Simply, select the button that corresponds to your preferred option, and you’ll be able to proceed with marking results accordingly for the relevant subjects or units of study.
- Select the Campus and Program from the drop-down as these are mandatory fields. You cannot proceed until you have selected an option from both fields.
- If you tick the “Show Only Current Student” checkbox, the system will display only enrolments that are currently active in the system.
- To select a date range for enrolments, you must specify both a start date and an end date. This field is usually mandatory, so you cannot proceed without completing it. Once you have selected your preferred date range, the system will display all enrolments that occur within that period. This feature is useful for quickly and easily locating the information you need.
- To select a timetable and classes, choose them from the drop-down menu. This will allow you to specify the exact timetable and classes that you are interested in. It’s important to select the correct timetable and classes to ensure you view the accurate information and that your queries or requests are processed accurately.
- In addition to selecting the campus, program, date range, timetable, and classes, you may also have the option to choose the intake and group training plan from the drop-down menus. The intake typically refers to the specific period during which a group of students commence their studies.
- The “Subject/UoS” field will display a list of all the subjects or units of study that are linked to the program you have selected. This will allow you to mark the results for each subject individually. By selecting the relevant subject from the list, you can then proceed to mark the results for that specific subject.
- The enrolment Type filter allows more precise and tailored searches, which will help the user filter students based on their enrolment type. This makes it easier to mark results in bulk for a specific enrolment type.

On the Results screen, you can bulk mark results for any subjects or units of study that are linked to enrolments. This feature allows you to mark all results at once rather than individually. It’s a convenient feature that can save you time and effort.
Note: It's important to note that if you do not select all of the mandatory fields, including Campus, Program, Enrolments between, and Subjects/UoS, the system will not display any records of enrolments. This is because these fields are required to filter and display the relevant data, and the system needs all of this information to generate the results you are looking for. Ensure that you all necessary fields are selecting before attempting to access or view enrolment records to avoid any errors or issues.

The options available under the Programs, Timetable, and Intake fields will be depend on the selected Campus. If you do not select the campus the option under Programs, Timetable and Intake will not be displayed.
- After selecting all the desired filters and fields, click the “Show Records” button to load all the enrolments that match your selected filters. This will generate a list of enrolment records that meet your selected criteria, allowing you to review and manage the data as needed. The “Show Records” button is an important final step in the process, as it triggers the system to retrieve and display the relevant data.
- Once you have generated the list of enrolment records that match your selected filters, you will need to select the relevant enrolments by ticking the checkboxes next to them. After selecting the enrolments you want to update, you can then choose the desired Result/Outcome from the drop-down menu and specify the Result date. You may also have the option to add any relevant notes or comments using the Notes icon or field. Once you have made all the necessary changes and updates, you can then click the “Save” button to store the updated data in the system.
Note: Before you proceed with making changes on this screen, you need to understand the below scenarios:

Scenario 1: Pre-Existing Subject Dates

If the start and end dates are already present in the grid for a subject and you attempt to add new dates in the Subject Start Date and End Date fields, then select the save button, the system will display a pop-up message on the screen. The message will say, “Please ensure that the subject dates fall within the enrolment dates.” Additionally, any pre-existing subject dates for students will remain unchanged. This means that the system will not overwrite existing dates if subject dates are already updated for any students.

Scenario 2: Updating Subject Dates

If there are no subject dates present for a subject in the grid and you update the dates and click save, the system will automatically update the subject dates for those students on the Training Plan and Results screen.

After you have selected all of the relevant parameters and fields, and updated the enrolment records as needed, the system will refresh the screen and update the results in the Enrolments grid. Additionally, the updated results will also be reflected in the Enrolment Dashboard > Training Plan and Results.
